

This is a real project. A master bedroom in a London home that had stopped working, not because it was structurally failing, but because it had never been properly designed. The room had adequate space. It had two windows. It had everything a bedroom needs and somehow still felt dark, cluttered, and too small to move around in comfortably.
What you will see in this case study is not just a cosmetic refresh. It is the result of a complete residential interior design process, from technical drawings and joinery details through to a finished room that functions as well as it looks.
What the Bedroom Looked Like Before Renovation?
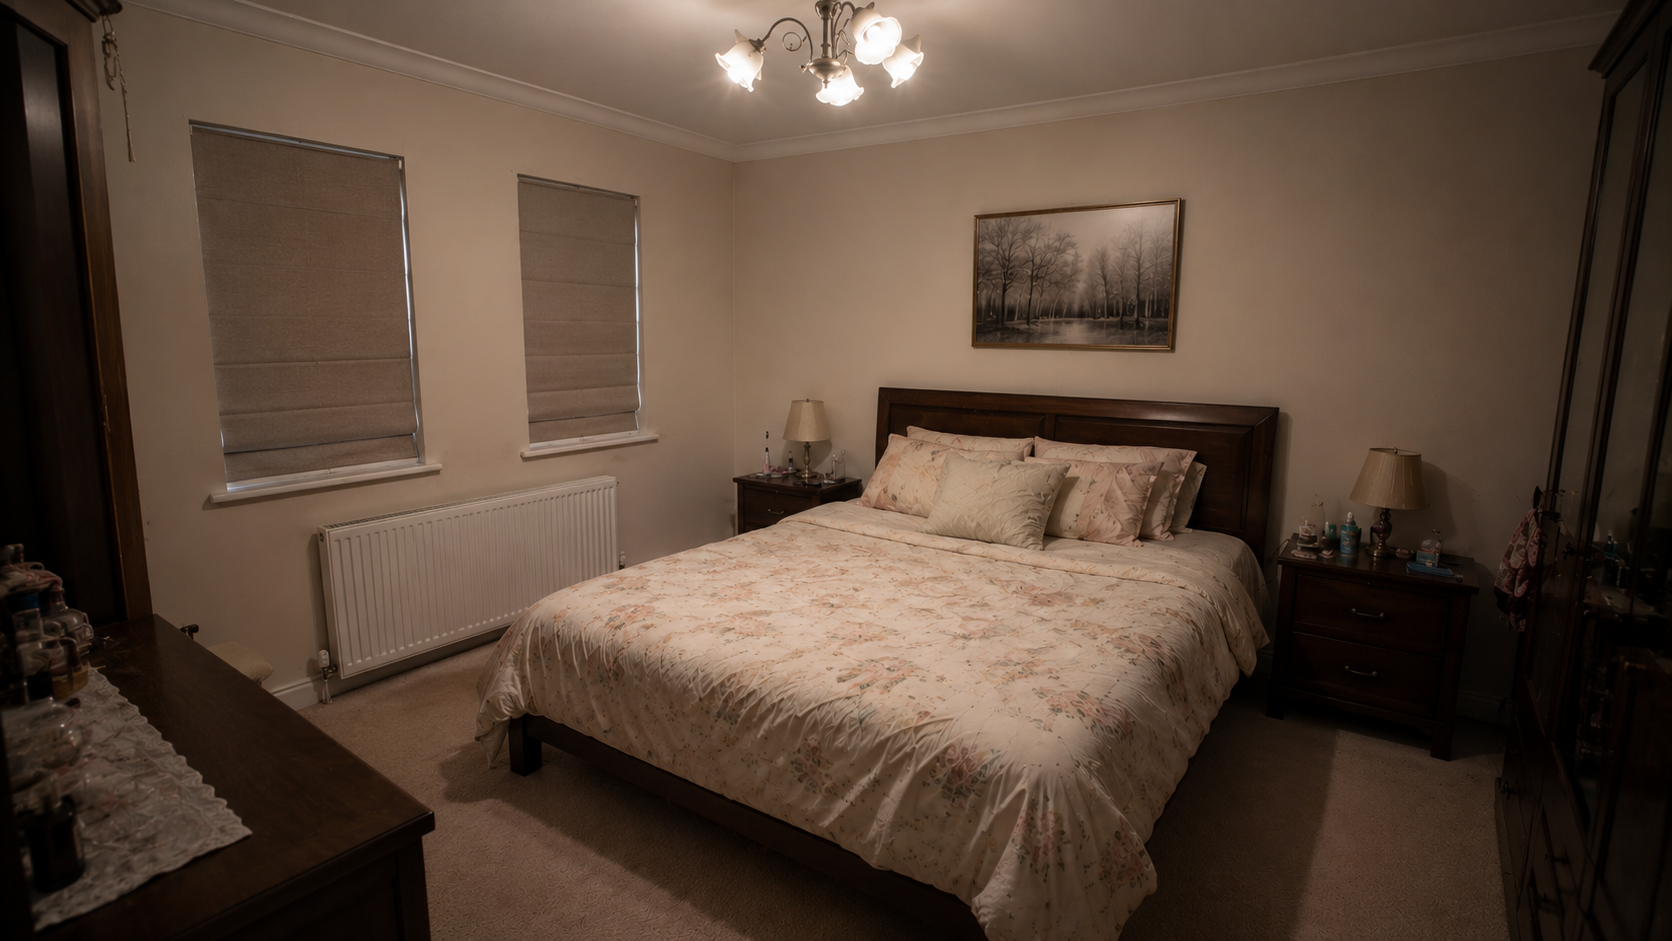
The before photographs tell the story clearly. The room was anchored by a heavy dark timber bed frame and matching freestanding furniture that absorbed what little evening light the single ceiling pendant produced. Two roller blinds sat flat against the windows. There was no coherent lighting scheme. Freestanding wardrobes and a dressing table sat against the walls, each chosen independently, none of them working together visually.
The room was not uncomfortable in any dramatic sense. It was simply never designed. Every piece of furniture had been selected in isolation. Nothing was fitted to the room. Nothing was coordinated. The result was a space that felt generic, dark, and considerably smaller than its actual floor area.
Storage was inadequate. Circulation was restricted. Bedside lighting was provided by two table lamps that sat on cluttered nightstands. There was no integrated lighting, no considered colour palette, and no visual hierarchy to draw the eye anywhere in particular.
This is the starting point that property refurbishment in London projects like this one begin from more often than clients expect. The problems are rarely dramatic. They are simply the accumulated result of a room that was furnished rather than designed.
The Design Brief and What the Client Wanted?
The brief was straightforward. The client wanted the bedroom to feel calmer, more spacious, and significantly more luxurious — without losing the warmth the room currently had. Storage needed to increase. The dressing area needed to function properly. The lighting needed to create atmosphere in the evenings rather than simply illuminate the space.
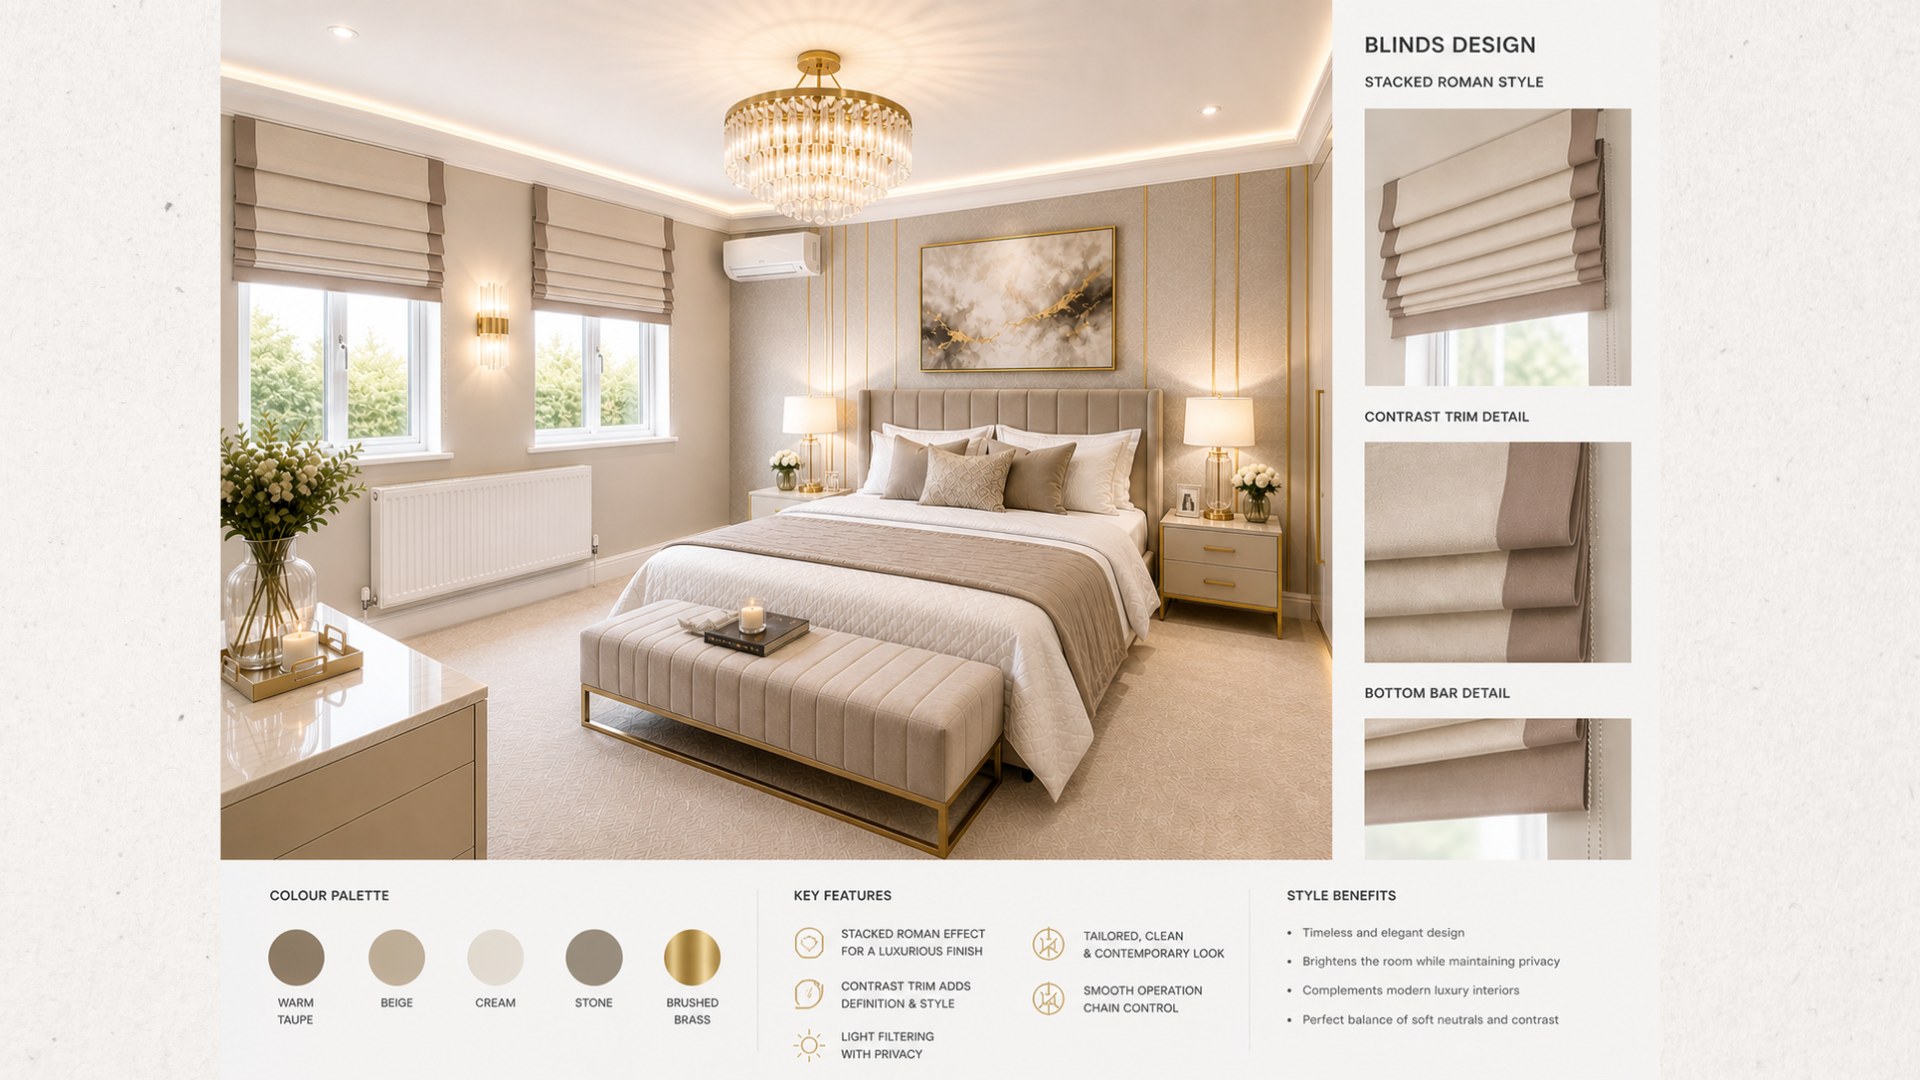
The colour direction chosen was warm taupe, beige, and brushed brass. A palette that reads as quiet and sophisticated, that works with both natural daylight and warm artificial light, and that ages well as a background for changing accessories and soft furnishings over time.
The brief also required full technical coordination. Every decision, joinery dimensions, electrical positions, lighting circuits, ceiling details, needed to be resolved before construction began. This was not a project where a moodboard would be handed to a builder and the details resolved on site. It was a project where contractor-ready drawings were produced for every wall, every fitting, and every piece of bespoke joinery before a single trade mobilised.
What the Technical Pack Covered For This Bedroom Renovation Project?
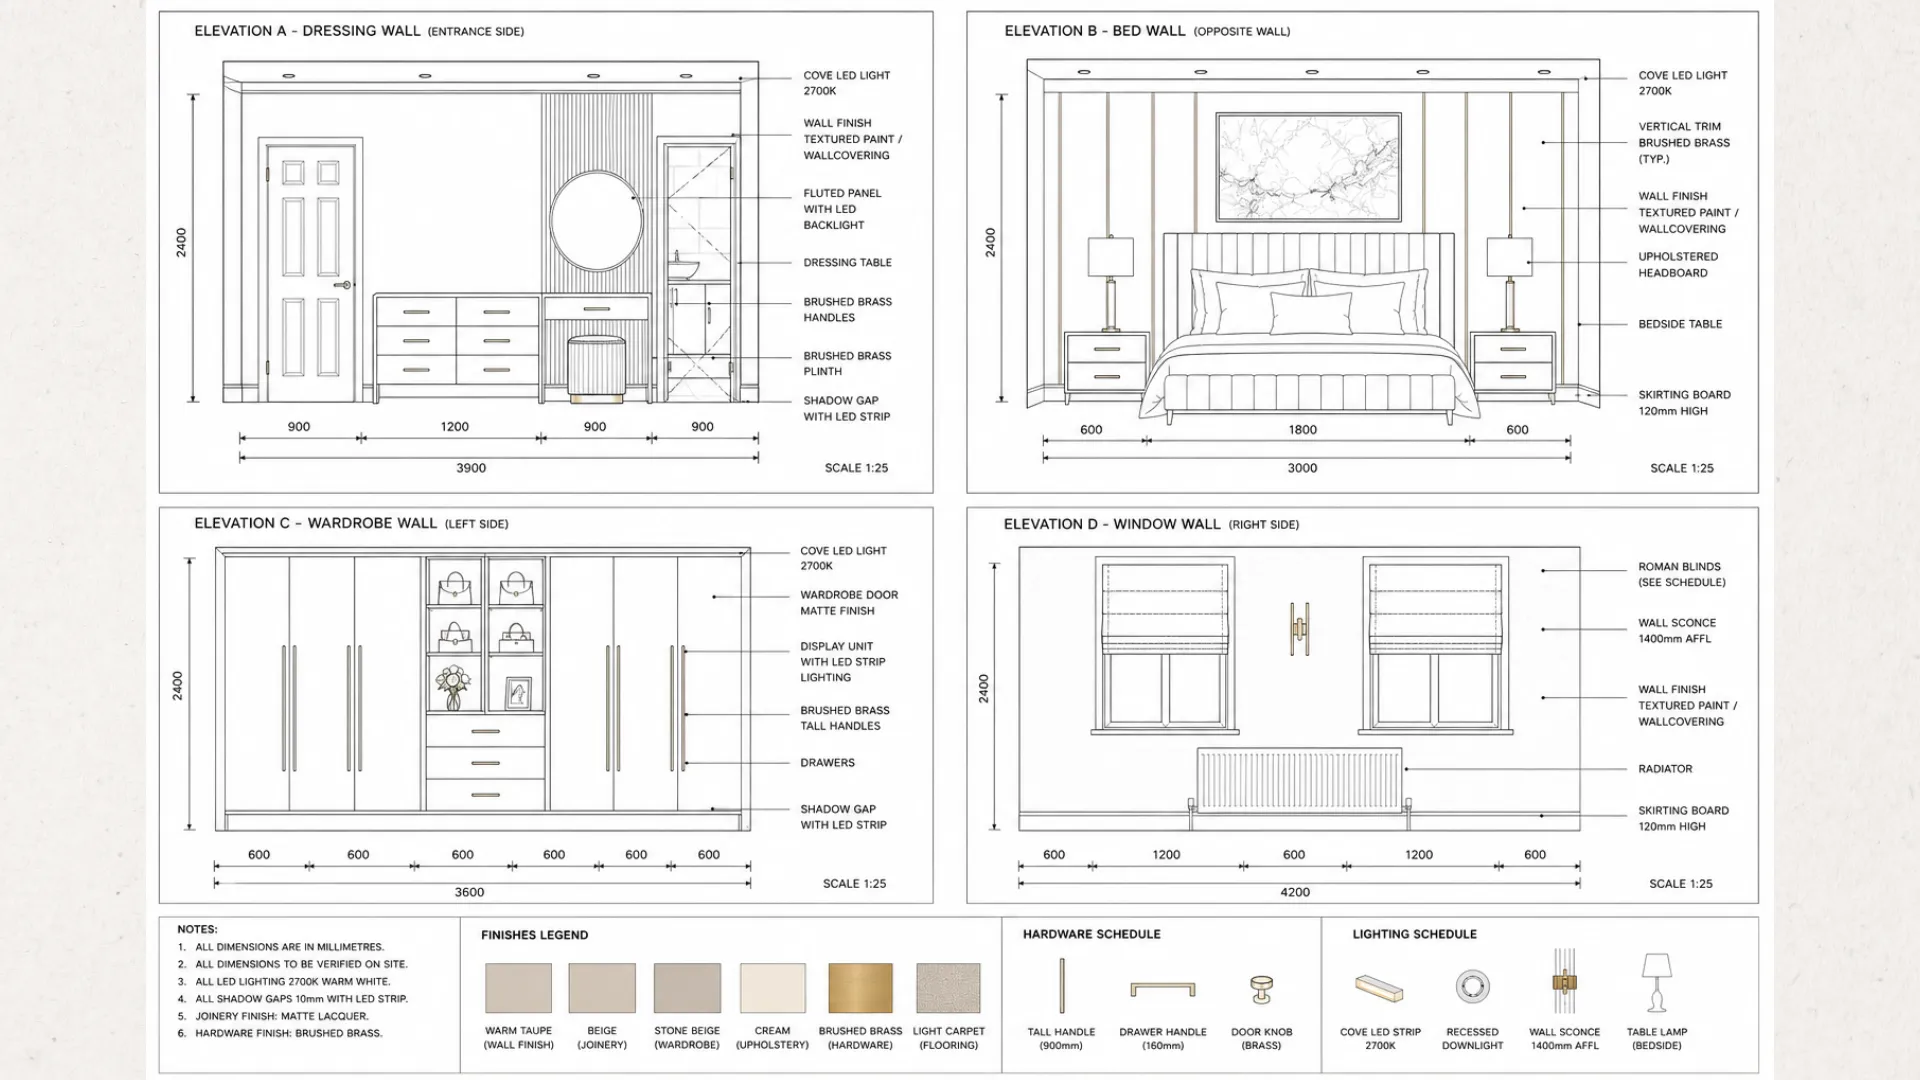
The design documentation for this project covered four full wall elevations, an electrical and lighting layout plan, bespoke joinery details for the wardrobe and dressing table, a blinds schedule, and a finishes and hardware schedule.
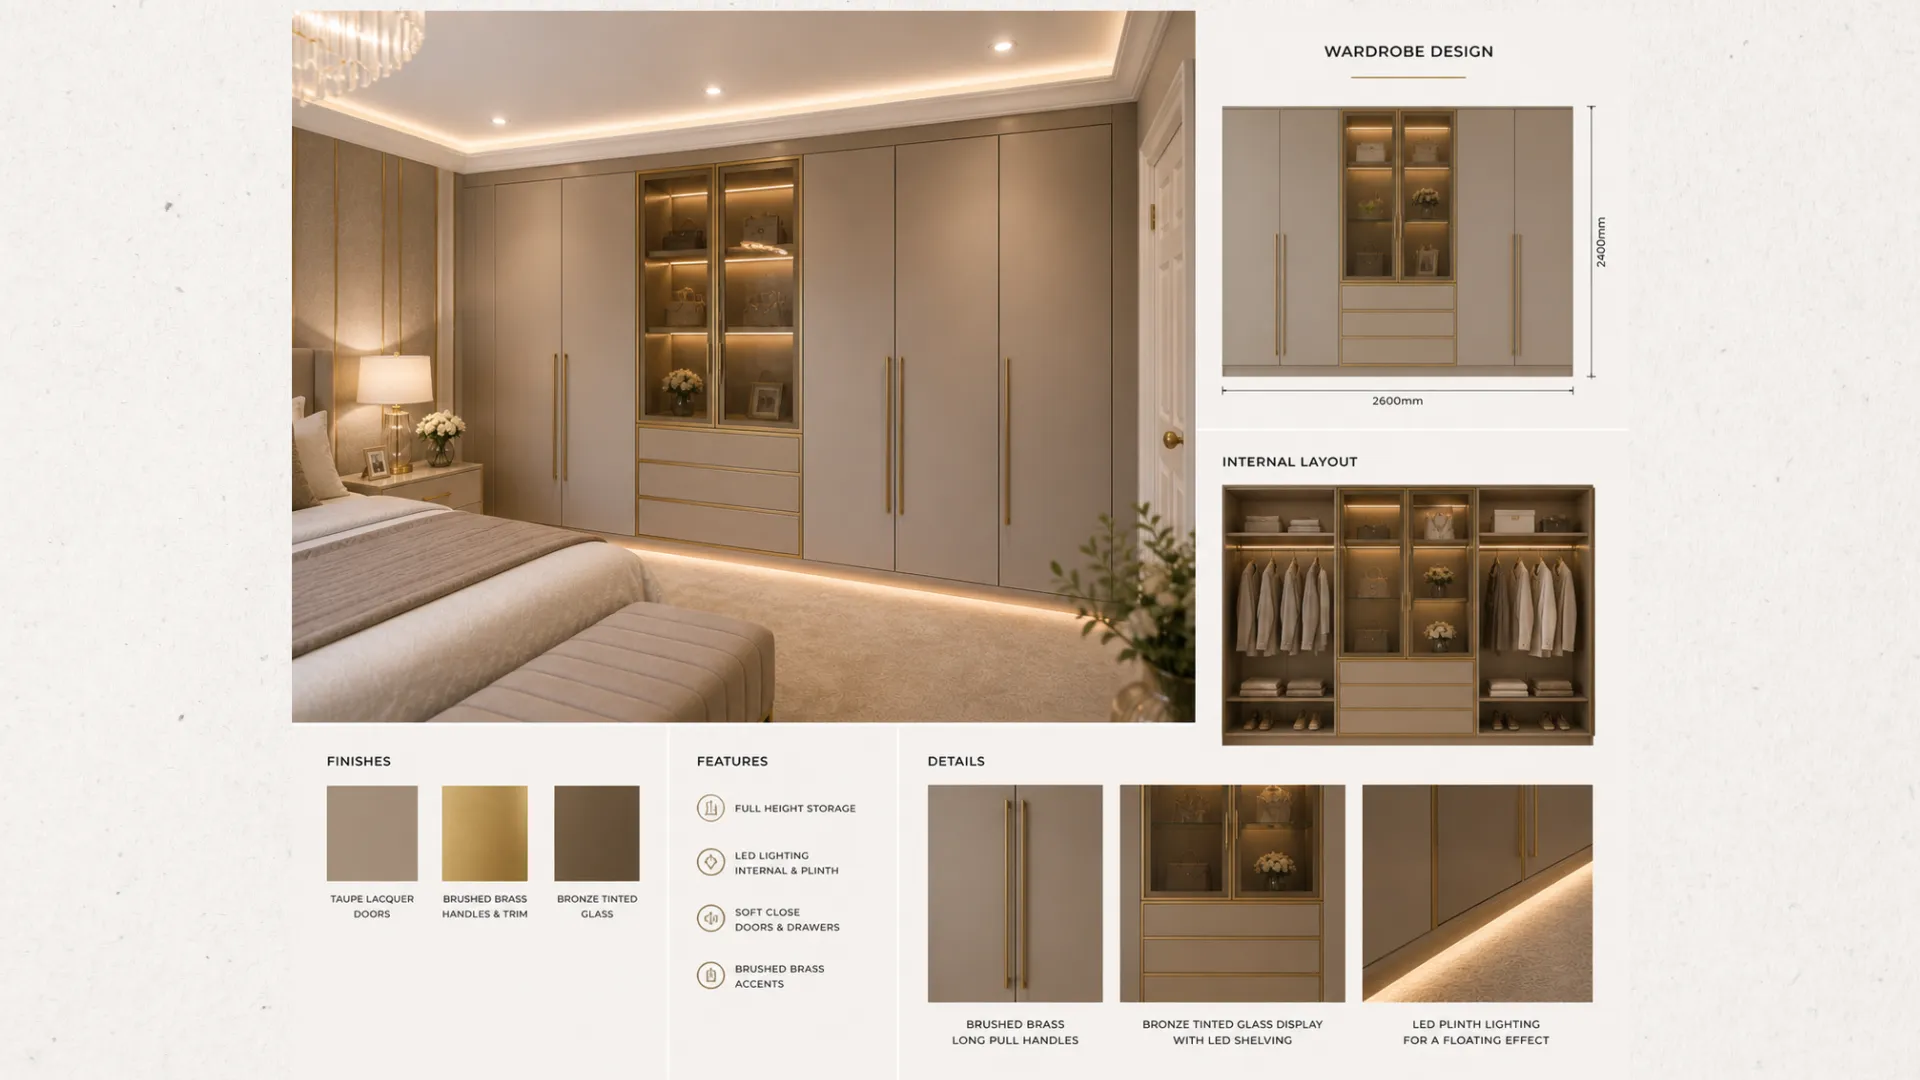
The wardrobe wall was designed to 3600mm wide by 2400mm high, with six bays of full-height storage, a central display unit with bronze-tinted glass and LED shelving, and integrated LED plinth lighting for a floating effect at floor level. All doors specified in matte taupe lacquer. All hardware in brushed brass — tall pull handles at 900mm, drawer handles at 160mm, and brass door knobs throughout.
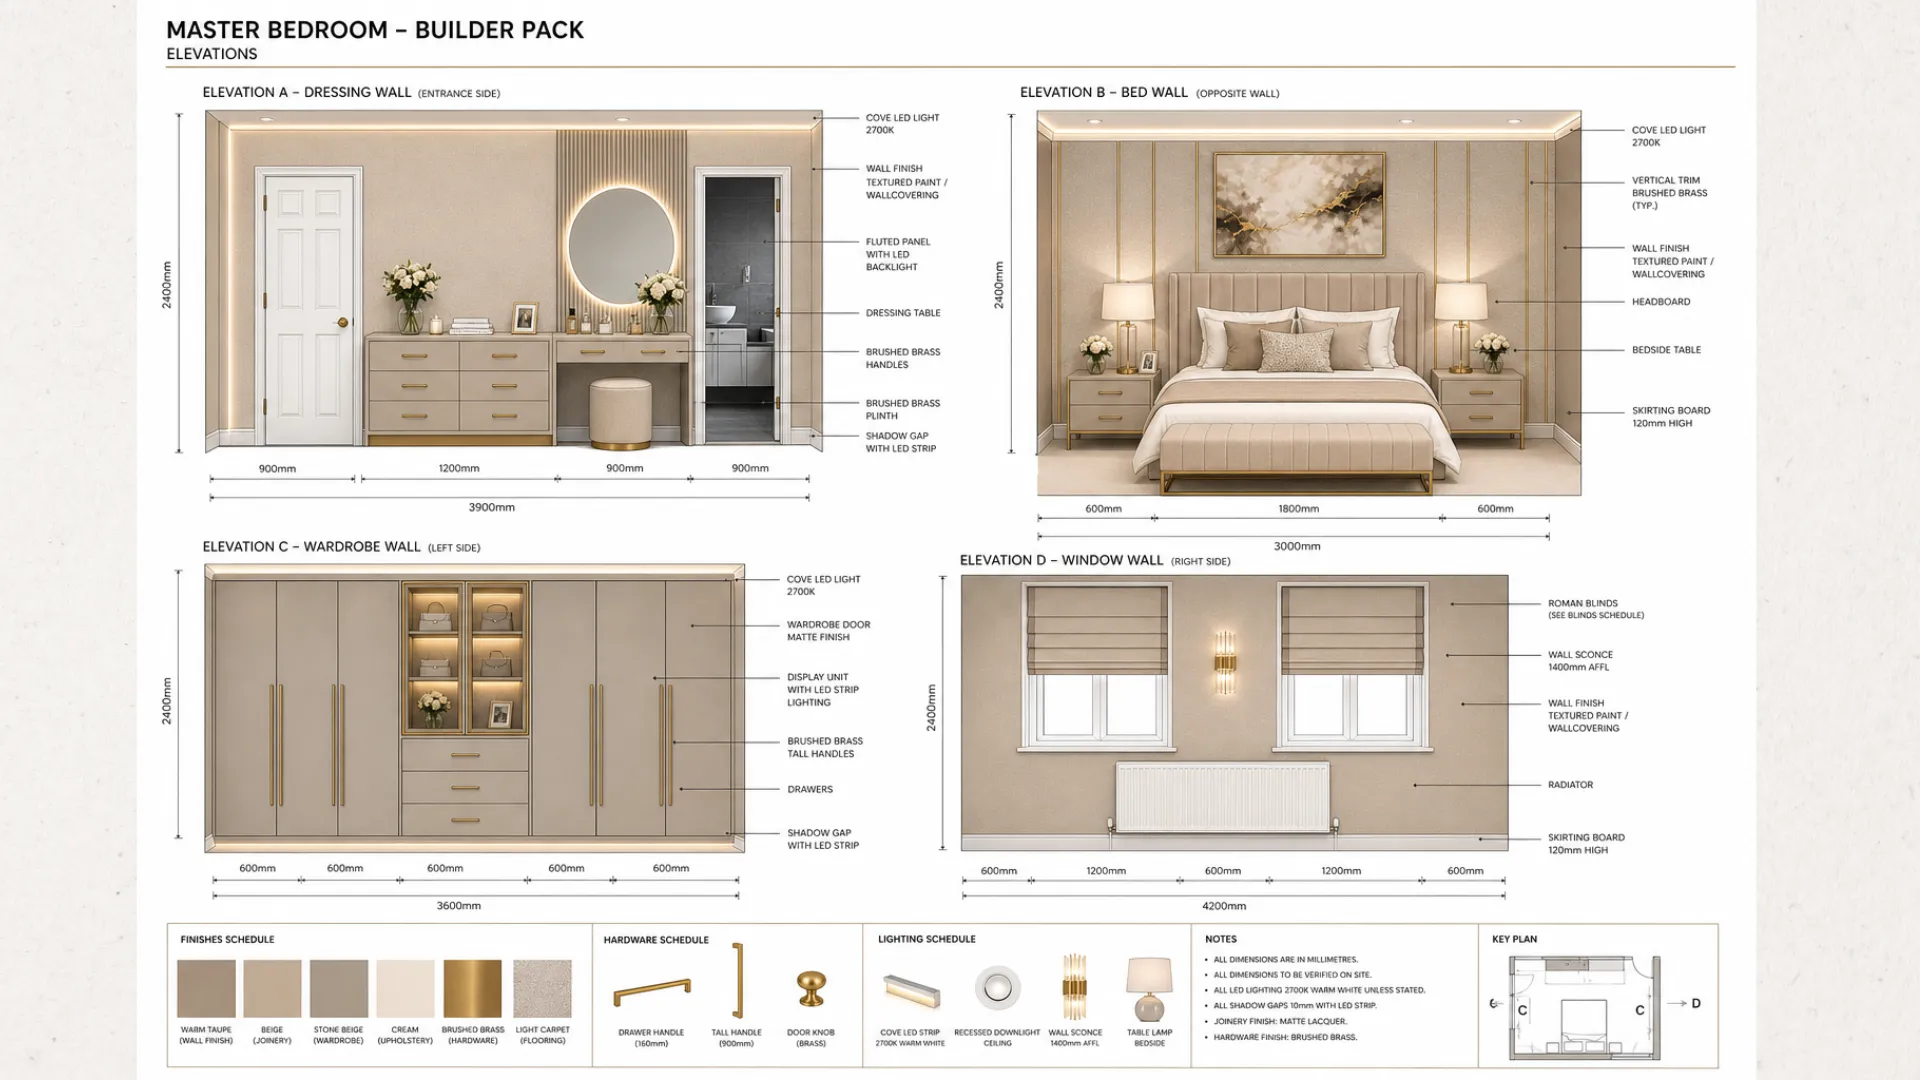
The dressing wall at 3900mm wide was designed around a central fluted wall panel with LED backlight, a round LED-backlit mirror, and a dressing table flanked by two chest-of-drawer units. The full wall was designed to read as a single composition rather than a collection of separate furniture items.
The electrical layout resolved all socket and switch positions in direct coordination with the joinery drawings. Six double sockets at 300mm above finished floor level on the wardrobe wall. Four switched sockets at 1350mm for bed wall appliances. A TV and data outlet at 1100mm on the window wall. All positions confirmed before first-fix electrical work began.
The lighting design comprised cove LED strip at 2700K running the full perimeter of the ceiling, ten recessed downlights at 7W 2700K warm white, a central chandelier, two wall sconces at 1400mm above floor level on the bed wall, wardrobe interior LED strip, and integrated LED shadow gap lighting on the joinery plinth. Every circuit was drawn separately and coordinated with the joinery and furniture positions before plastering.
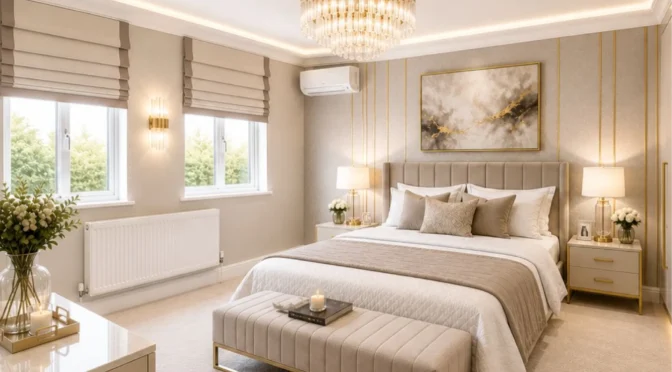
After: What the Room Became After Renovation?
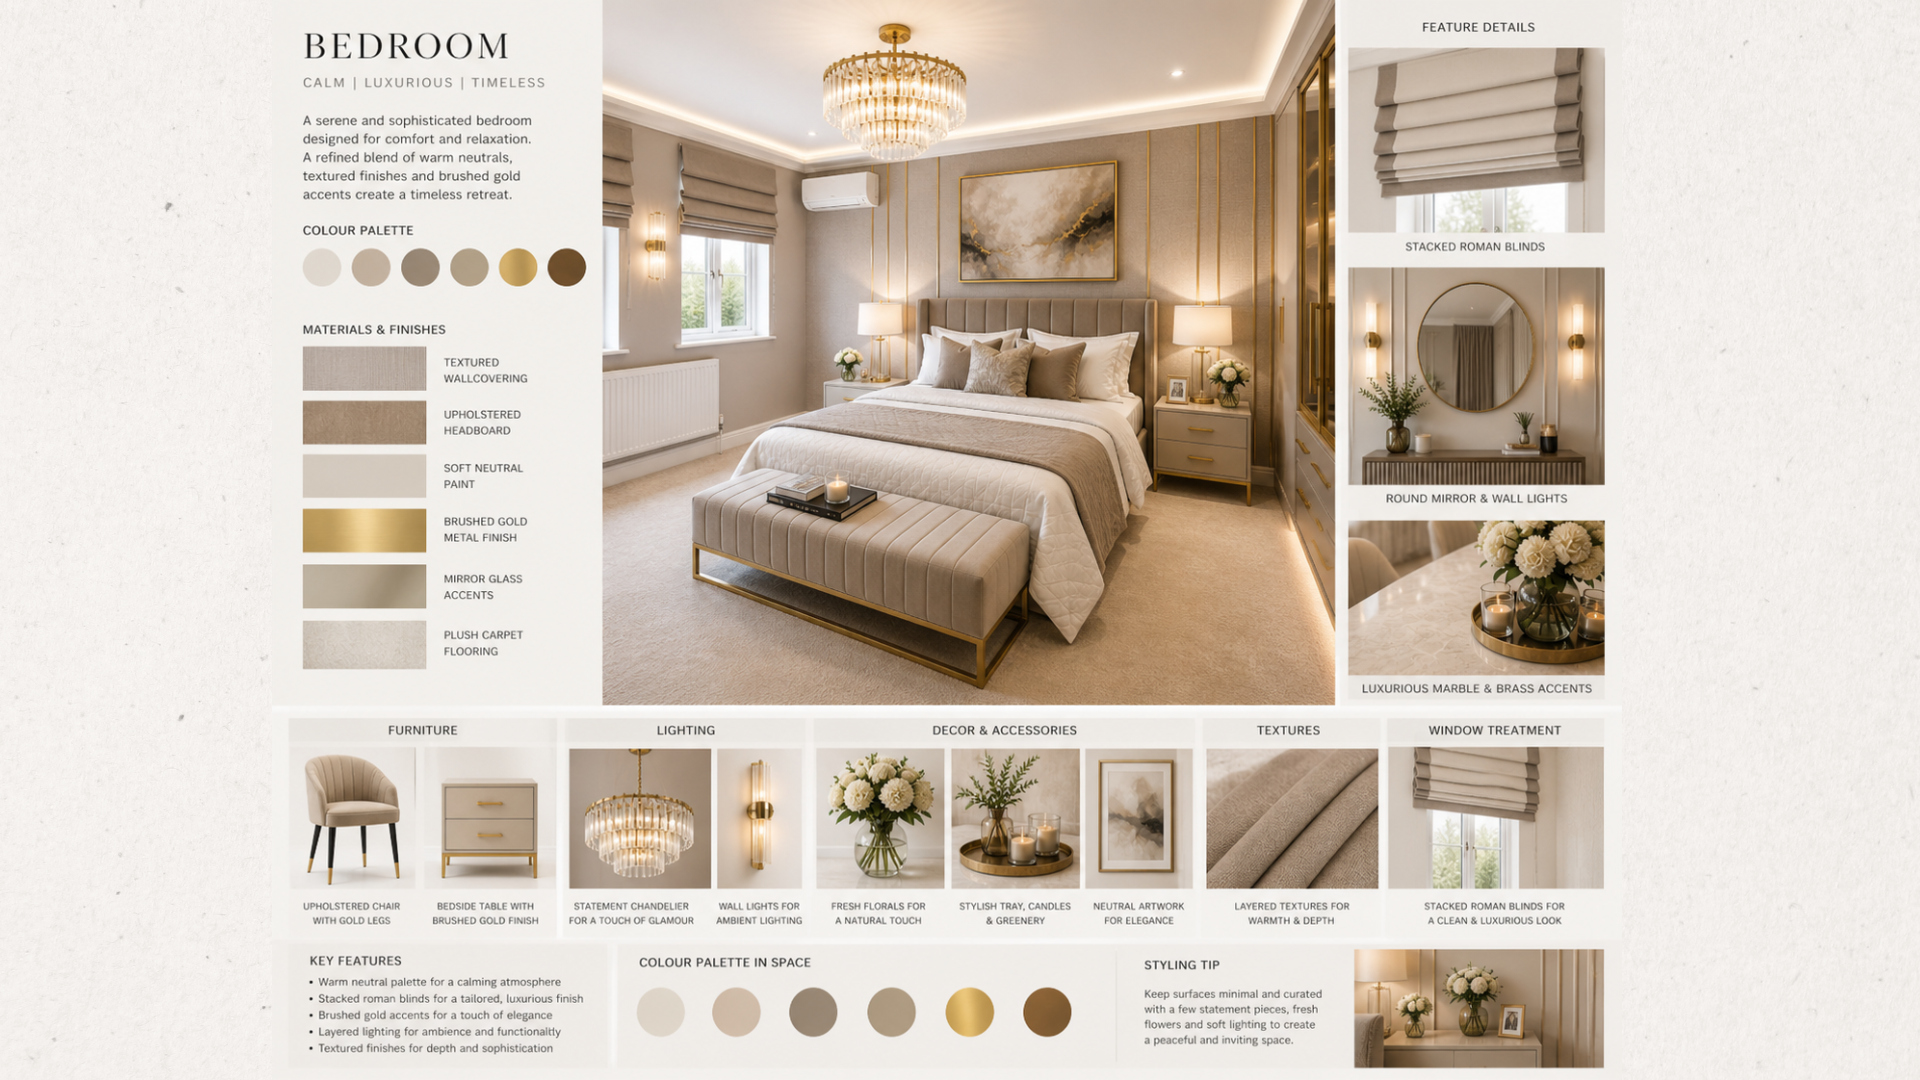
The finished bedroom is a composed, calm, and genuinely luxurious space. The warm taupe palette reads consistently across walls, joinery, and soft furnishings. The brushed brass hardware carries through every element, wardrobe handles, mirror frame, bedside table legs, blind trim details, creating a material cohesion that the original room had no version of.
The stacked Roman blinds in warm neutral fabric with contrast trim replace the flat roller blinds entirely. They stack cleanly when open, allowing maximum natural light, and create a tailored, architectural frame to both windows when closed.
The wardrobe wall now provides full-height storage across the entire left side of the room. The central display unit with bronze-tinted glass and lit shelving breaks the run of solid doors and creates a visual focal point that the room previously lacked. The LED plinth lighting at floor level makes the entire wardrobe wall appear to float, a detail that reads as understated luxury in photographs and is even more apparent in person.
The dressing area functions as a proper dressing suite within the bedroom itself. The fluted panel behind the mirror, the backlit round mirror, the upholstered stool, each element was designed as part of a coherent composition rather than selected independently. The result is a dressing wall that could comfortably belong in a five-star hotel suite.
Ceiling lighting at 2700K warm white creates an atmosphere in the evenings that the original single pendant fitting was never capable of delivering. The cove strip, the downlights, the wall sconces, and the wardrobe lighting operate as a layered system across separate circuits, each adjustable to suit the time of day and the use of the room.
Most significantly, the room now feels considerably larger than before the renovation. No structural work was carried out. No walls were moved. The floor area is identical. The difference is entirely the product of considered interior architecture, furniture positioned to maximise circulation, storage integrated into the walls rather than projecting from them, and lighting designed to add depth and atmosphere rather than simply illuminate.
What This Bedroom Renovation Project Demonstrates?
Every decision in this bedroom was made on paper before it was made in the room. The joinery dimensions were confirmed before the electrician completed first-fix. The lighting positions were coordinated with the wardrobe layout before the ceiling was plastered. The socket positions were resolved around the furniture plan before a single wall was made good.
This is the difference between a renovation that runs smoothly and one that generates expensive rework, delays, and compromised results. It is also the difference between a finished bedroom that looks exactly as designed and one that looks like a reasonable approximation of what was intended.
If you are planning a bedroom renovation or a wider property refurbishment in London and want to discuss your project with a team that manages design and construction from a single coordinated brief, book a free consultation with Oraanj Interiors.
